0xC9: Set Colors in the GP2 Palette
A preserved GP2 track editing reference describing command 0xC9 / 201.
With this command you can set colors of the GP2 palette.
The arguments of command 0xC9 are probably:
a1: ?always 0
a2: palette index 1
a3: palette index 2
a4: hue angle 1
a5: hue angle 2
a6: saturation 1
a7: saturation 2
a8: value 1
a9: value 2
John Verheijen wrote that these commands must be in track section 0, otherwise they will not work.
GP2 Palette
The following picture shows the standard GP2 palette. The 256 colors are indexed from top left to bottom right. We see a little pointer that points to a certain index.
As you may know, in pictures on the computer, such as bitmaps, you have indices to a color palette, not the colors themselves. For example, if you have a tarmac texture, which is basically an ordinary bitmap, you may have many pixels with the value 192. When these pixels are shown on the screen, the graphics engine looks this value up in the color palette and takes the color defined there, at palette entry index 192.
We immediately recognize consequences of this concept. If we want to change the color of a pixel that we see on the screen, we have two possibilities.
We can change the pixel value in the bitmap. That means we change it to another index in the palette, for example 253, to get the nice color far to the right in the bottom row of the palette above.
Or we can change the palette color that is indexed by the pixel. But that way, any pixel with the same value is also changed.
But I guess you all knew this already.
Color Definitions
There are several ways of defining colors. You may know RGB, where you define a red, a green, and a blue value. Then these three basic colors are mixed to the color you see.
There are also other definitions, for example Cyan, Magenta, Yellow, blacK, etc.
GP2 seems to work with a definition called HSV, or Hue-Saturation-Value, at least when dealing with command 0xC9.
HSV Colors
Selecting an HSV color looks like this, as found in a typical painting program:
When selecting an HSV color, we set a value for the hue angle, saturation, and value/intensity. These three numbers define the color.
Calculations
Because life is hard, you cannot simply insert the values from the above example into 0xC9 and get a nice pink. As usual, some calculating is required first.
In the hue circle we have a range of 0..359 degrees, but in programming we have the byte, and the byte has a range of 0..255. So we divide 312 from the above example by 360, then multiply by 256, and get about 222.
For the saturation and value/intensity we have a range of 0..100%. In command 0xC9, the range seems to be 0..50 corresponding to 0..100%, found by trial and error. That means we divide the values of the above example by 2. 70 gives 35, and 76 gives 38.
For both parameters, values above 100% seem to be possible in GP2. See some 0xC9 commands in the original tracks, and see the table below as exported with the Track Editor's “export track commands” function.
In fact, values 0..255 seem to be valid. Higher values get clipped, meaning for example that 270 gives 14.
However, the previously calculated three values are now inserted into command 0xC9 with a2=192 in T0, track sector 0, in Monaco. This is the command said to darken the tarmac in the tunnel.
We save the track and enter the game. We immediately go to the tunnel of Monaco and see what we expected to see:
How Come?
But why is the tarmac in the tunnel pink and not, for example, the sea?
Because the tarmac bitmap was mainly painted with the color at index 192 of the GP2 color palette.
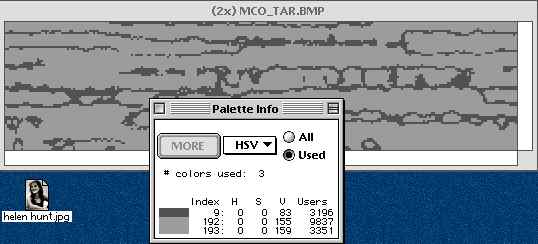
When we wrote 192 into a2 and a3, we intended to change palette entry 192. If the tarmac in the tunnel is the only bitmap or JAM using color 192, we see our pink just there. But if the crosswalk texture also has color 192, then we get pink and white crosswalks.
In the above Palette Info window we see why I knew how many pixels with value 192 are in the tarmac. We also see that color 193 is used. Now we realize why there is also a command 0xC9 with a2=193 in Monaco. To verify what we learned, we now change color 193 to some different color.
Here is the color-picker dialog box again. This time we choose a nice green:
If applying the mentioned algorithms we get:
New hue angle := hue angle * 255 / 360
a5 = 124 * 255 / 360
a5 = about 88

New saturation := saturation / 2
a7 = 100 / 2
a7 = 50

New value := value / 2
a9 = 80 / 2
a9 = 40
We insert the values in the command editor:
Again we go and have a look in the tunnel. What we see is no surprise to us:
We now know how to set any color on the tarmac in the tunnel of Monaco, and everywhere else. We just have to follow the previous examples.
For further experiments, see the HSV colors palette in the appendix at the end of this file.
So Far So Good. But...
Looking at command 0xC9, it seems like we can change two colors at once. But that is not the case. To be honest, I could not figure out how it works in detail. With command 0xC9 we definitely affect two palette entries, but the two changes somehow interfere.
What I can say is this: if you want to change a certain color like the tarmac colors 192 and 193, you may want to change them one by one with their own command 0xC9. Insert the same index twice in a2 and a3, like in the example above.
Some More Experiments
I made some more experiments with the tarmac in the tunnel of Monaco. I removed all 0xC9 commands but one and set the pink (P) and green (G) values according to the argument list at the top of this text.
In the bar above the following screenshot you see something like “192 P - 193 G.” That means in that example I set color 192 to the pink values and color 193 to the green values, meaning:
a1 = 0
a2 = 192
a3 = 193
a4 = 222
a5 = 88
a6 = 35
a7 = 50
a8 = 38
a9 = 40
If we had “193 G - 192 P,” that would give:
a1 = 0
a2 = 193
a3 = 192
a4 = 88
a5 = 222
a6 = 50
a7 = 35
a8 = 40
a9 = 38I am afraid the last part is a bit confusing. And I am confused also. I cannot see the rule.
Thoughts
- Looking at the 0xC9 commands in the original tracks, it seems that the index in a2 is always smaller than the index in a3.
- The color with the higher index seems to work as expected, in whatever position it is set. If you look at the screenshots, except the very first screenshot where there is no index 193, it always gets set to the second color definition.
- But what happens to color index 192 when there is another index with a higher number? If it is in the first position, its hue angle gets shifted to a value about 40, about 27 in GP2. The other two values seem unchanged. If it is in the second position, it simply gets ignored.
But we will find out...
Revisions
Version 1.1
- Slight revisions here and there.
- Introduced revision history.
- Added appendix with GP2 palette.
Version 1
First version.